
// 이곳에 쓴 내용은 앱 만들기라는 버킷리스트를 달성하기 위해 플러터를 공부하면서 정리하고 있는 내용입니다.
플러터에 대해 아는 것이 거의 없기 때문에 정리하면서 오류가 있을 수 있습니다.
오류를 발견하신 분은 댓글 남겨 주시면 감사하겠습니다.
앱을 코딩?하면서 동시에 티스토리 글도 쓰고 있다. 그래서 이 포스팅의 결과가 어떻게 될지 모른다.
그래서 글이 성공이나 정보의 가치가 있는 글이 될지도 모르겠다. 쓸 때는 나 같은 사람도 있으니 혹시라도 이 글을 읽게 되는 사람이 있다면 같이 힘을 내보자는 취지이면서 도움이 되는 글이었음 좋겠는데, 끝이 좋지 못해 참 아쉬운 글이 되어 가고 있다.
암튼, Do it! 스터디룸 카페에 질문을 남겼고, 그 글에 귀인(진심 감사합니다.)이 답글을 달아주셨다. 해결이 됐음 좋겠지만 안되어도 누군가의 어려움에 도움을 주고자 하는 그 마음만으로도 감사하다. 나도 누군가에게 이런 도움이 되는 사람이었음 좋겠다.
내 스스로 힘을 내보고자 사족이 길다. 화이팅 하자 화이팅.. (아참, 난 원래 불평과 못하겠다는 말을 자주 한다.)
https://cafe.naver.com/doitstudyroom
Do it! 스터디룸 : 네이버 카페
Do it!, 된다 시리즈 책으로 함께 공부하고 서로 돕는 사람들을 만나 보세요. python, C, java, Android
cafe.naver.com
다시 도전!! 파이어베이스 설정하기
1. 파이어베이스에 새 프로젝트 생성 후 안드로이드 앱 추가(플러터에 만들었던 앱 패키지 이름 기입)
2. google-services.json 파일 내려받고, 안드로이드스튜디오-프로젝트-android(앱 이름 또는 프로젝트)-app 폴더에 받은 파일 넣기
3. file-open- 프로젝트-android(앱 이름 또는 프로젝트) 폴더 새창에서 열기 이후 클래스 경로 추가하기, 플러그인 추가하기
희망을 갖고 시작했으나 역시나 카페에서 소개하는 그래들 파일이 보이지 않습니다.
파이어베이스에서는 아래와 같이 소개를 하고 있는데, 역시나 build.gradle.kts에는


되든 안되든 settings.gradle(Project Settigs)에 비슷한 구조가 보여서 붙여 넣기 해준다. 소괄호는 삭제. Sync Now

그리고 build.gradle(Module :app)에 세줄을 추가해 주었다. id 부분은 다들 ()가 없기에 뺐고, dependencies에는 비어 있어서 파이어 베이스에 있는 그대로 붙여 놓고 Sync Now
plugins {
    id "com.android.application"
    id "kotlin-android"
    id "dev.flutter.flutter-gradle-plugin"
    id "com.google.gms.google-services"
}

def localProperties = new Properties()
def localPropertiesFile = rootProject.file('local.properties')
if (localPropertiesFile.exists()) {
    localPropertiesFile.withReader('UTF-8') { reader ->
        localProperties.load(reader)
    }
}

def flutterVersionCode = localProperties.getProperty('flutter.versionCode')
if (flutterVersionCode == null) {
    flutterVersionCode = '1'
}

def flutterVersionName = localProperties.getProperty('flutter.versionName')
if (flutterVersionName == null) {
    flutterVersionName = '1.0'
}

android {
    namespace "com.chungi.go_kotour"
    compileSdk flutter.compileSdkVersion
    ndkVersion flutter.ndkVersion

    compileOptions {
        sourceCompatibility JavaVersion.VERSION_1_8
        targetCompatibility JavaVersion.VERSION_1_8
    }

    kotlinOptions {
        jvmTarget = '1.8'
    }

    sourceSets {
        main.java.srcDirs += 'src/main/kotlin'
    }

    defaultConfig {
        // TODO: Specify your own unique Application ID (https://developer.android.com/studio/build/application-id.html).
        applicationId "com.chungi.go_kotour"
        // You can update the following values to match your application needs.
        // For more information, see: https://docs.flutter.dev/deployment/android#reviewing-the-gradle-build-configuration.
        minSdkVersion flutter.minSdkVersion
        targetSdkVersion flutter.targetSdkVersion
        versionCode flutterVersionCode.toInteger()
        versionName flutterVersionName
    }

    buildTypes {
        release {
            // TODO: Add your own signing config for the release build.
            // Signing with the debug keys for now, so `flutter run --release` works.
            signingConfig signingConfigs.debug
        }
    }
}

flutter {
    source '../..'
}

dependencies {
    implementation(platform("com.google.firebase:firebase-bom:33.0.0"))
    implementation("com.google.firebase:firebase-analytics")
}
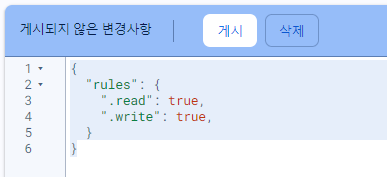
4. 파이어베이스 빌드/Realtime Database/데이터베이스 만들기/실시간데이터베이스 위치(미국) 다음/테스트 모드에서 시작 사용설정/주소 복사/규칙 탭으로 이동/read, write를 true로 변경(아래 사진) /게시
5. 애드몹에 안드로이드 앱 추가
-플랫폼 Android, 앱 스토어에 등록 아니오 선택 후 계속-앱 이름 입력/ 완료/ 앱설정 탭에서 앱 ID 복사해 놓기/ 광고 단위 탭에서 시작하기/ pubspec.yaml(firebase_database, google_mobile_ads) 추가/ 안드로이드 프로젝트에서 AndroidManifest.xml 파일에서 애드몹 메타 데이터 추가하기
아래 링크는 애드몹에서 제공하슨 설명입니다. 책 설명보다는 최신일 거 같아서 링크 올려 둡니다.
https://developers.google.com/admob/android/quick-start?hl=ko#import_the_mobile_ads_sdk
시작하기 | Android | Google for Developers
Android 앱을 제작 중인 Google AdMob 게시자를 위한 모바일 광고 SDK입니다.
developers.google.com
그래서 아래와 같이 각각 입력했고 입력할 때마다 sync now를 눌러 줬다.
build.gradle(Project: android)
plugins {
    id "com.android.application"
    id "kotlin-android"
    id "dev.flutter.flutter-gradle-plugin"
    id "com.google.gms.google-services"
}

def localProperties = new Properties()
def localPropertiesFile = rootProject.file('local.properties')
if (localPropertiesFile.exists()) {
    localPropertiesFile.withReader('UTF-8') { reader ->
        localProperties.load(reader)
    }
}

def flutterVersionCode = localProperties.getProperty('flutter.versionCode')
if (flutterVersionCode == null) {
    flutterVersionCode = '1'
}

def flutterVersionName = localProperties.getProperty('flutter.versionName')
if (flutterVersionName == null) {
    flutterVersionName = '1.0'
}

android {
    namespace "com.chungi.go_kotour"
    compileSdk flutter.compileSdkVersion
    ndkVersion flutter.ndkVersion

    compileOptions {
        sourceCompatibility JavaVersion.VERSION_1_8
        targetCompatibility JavaVersion.VERSION_1_8
    }

    kotlinOptions {
        jvmTarget = '1.8'
    }

    sourceSets {
        main.java.srcDirs += 'src/main/kotlin'
    }

    defaultConfig {
        // TODO: Specify your own unique Application ID (https://developer.android.com/studio/build/application-id.html).
        applicationId "com.chungi.go_kotour"
        // You can update the following values to match your application needs.
        // For more information, see: https://docs.flutter.dev/deployment/android#reviewing-the-gradle-build-configuration.
        minSdkVersion flutter.minSdkVersion
        targetSdkVersion flutter.targetSdkVersion
        versionCode flutterVersionCode.toInteger()
        versionName flutterVersionName
    }

    buildTypes {
        release {
            // TODO: Add your own signing config for the release build.
            // Signing with the debug keys for now, so `flutter run --release` works.
            signingConfig signingConfigs.debug
        }
    }
}

flutter {
    source '../..'
}

dependencies {
    implementation(platform("com.google.firebase:firebase-bom:33.0.0"))
    implementation("com.google.firebase:firebase-analytics")
    implementation ("com.google.android.gms:play-services-ads:23.0.0")
}
build.gradle(Module:app)
plugins {
    id "com.android.application"
    id "kotlin-android"
    id "dev.flutter.flutter-gradle-plugin"
    id "com.google.gms.google-services"
}

def localProperties = new Properties()
def localPropertiesFile = rootProject.file('local.properties')
if (localPropertiesFile.exists()) {
    localPropertiesFile.withReader('UTF-8') { reader ->
        localProperties.load(reader)
    }
}

def flutterVersionCode = localProperties.getProperty('flutter.versionCode')
if (flutterVersionCode == null) {
    flutterVersionCode = '1'
}

def flutterVersionName = localProperties.getProperty('flutter.versionName')
if (flutterVersionName == null) {
    flutterVersionName = '1.0'
}

android {
    namespace "com.chungi.go_kotour"
    compileSdk flutter.compileSdkVersion
    ndkVersion flutter.ndkVersion

    compileOptions {
        sourceCompatibility JavaVersion.VERSION_1_8
        targetCompatibility JavaVersion.VERSION_1_8
    }

    kotlinOptions {
        jvmTarget = '1.8'
    }

    sourceSets {
        main.java.srcDirs += 'src/main/kotlin'
    }

    defaultConfig {
        // TODO: Specify your own unique Application ID (https://developer.android.com/studio/build/application-id.html).
        applicationId "com.chungi.go_kotour"
        // You can update the following values to match your application needs.
        // For more information, see: https://docs.flutter.dev/deployment/android#reviewing-the-gradle-build-configuration.
        minSdkVersion flutter.minSdkVersion
        targetSdkVersion flutter.targetSdkVersion
        versionCode flutterVersionCode.toInteger()
        versionName flutterVersionName
    }

    buildTypes {
        release {
            // TODO: Add your own signing config for the release build.
            // Signing with the debug keys for now, so `flutter run --release` works.
            signingConfig signingConfigs.debug
        }
    }
}

flutter {
    source '../..'
}

dependencies {
    implementation(platform("com.google.firebase:firebase-bom:33.0.0"))
    implementation("com.google.firebase:firebase-analytics")
    implementation ("com.google.android.gms:play-services-ads:23.0.0")
}
그리고 pubspec.yaml 파일에 아래와 같이 추가했다.
dependencies:
  flutter:
    sdk: flutter
  firebase_analytics: ^10.10.5
  firebase_database: ^10.5.5
  google_mobile_ads: ^5.1.0
이제 다시 코드 타자 연습 모드로~!! 되든 안되든~!!
엄청난 양의 패키지를 등록했다.
dependencies:
  flutter:
    sdk: flutter
  flutter_firebase_chat_core: ^1.6.7
  firebase_messaging: ^14.9.2
  firebase_analytics: ^10.10.5
  firebase_database: ^10.5.5
  google_mobile_ads: ^5.1.0
  http: ^1.2.1
  sqflite: ^2.3.3+1
  path: ^1.9.0
  shared_preferences: ^2.2.3
  crypto: ^3.0.3
  google_maps_flutter: ^2.6.1
신나게? 코드 타자 연습을 마쳤다.
import 'package:firebase_core/firebase_core.dart';
import 'package:flutter/material.dart';
import 'package:go_kotour/signPage.dart';

import 'login.dart';

void main() async {
  WidgetsFlutterBinding.ensureInitialized();
  await Firebase.initializeApp(
    options: const FirebaseOptions(
      apiKey: '',
      appId: '',
      messagingSenderId: '',
      projectId: '',
      databaseURL: '',
    )
  );
  runApp(const MyApp());
}
class MyApp extends StatelessWidget {
  const MyApp({super.key});

  @override
  Widget build(BuildContext context) {
    return MaterialApp(
      title: 'Go_Kotour',
      theme: ThemeData(
        primarySwatch: Colors.blue,
      ),
      initialRoute: '/',
      routes: {
        '/': (context) => const LoginPage(),
        '/sign': (context) => const SignPage()
      },
    );
  }
}
main.dart, user.dart, login.dart. signPage.dart. 결과는 error
그나마 다행스러운 점은 타이핑으로 틀린 부분이 거의 없다는 점.
오늘의 에러 메시지는
Error parsing LocalFile: 'C:\flutter project\go_kotour\android\app\src\main\AndroidManifest.xml' Please ensure that the android manifest is a valid XML document and try again.
이란다.
AndroidManifest 파일을 보강하라는데.. 오늘은 여기까지 하자~ 고생했다~
'버킷리스트 > 앱 만들기' 카테고리의 다른 글
| 오공완 (with Do it! 플러터 앱 프로그램밍) #15_1 (0) | 2024.05.28 |
|---|---|
| 오공완 (with Do it! 플러터 앱 프로그램밍) 다시 #13 (안드로이드 스튜디오, 플러터 구 버전(이전 버전) 설치 (0) | 2024.05.22 |
| 오공완 (with Do it! 플러터 앱 프로그램밍) #14_1 (0) | 2024.05.17 |
| 오공완 (with Do it! 플러터 앱 프로그램밍) #13_2 (1) | 2024.05.16 |
| 오공완 (with Do it! 플러터 앱 프로그램밍) #13_1 (0) | 2024.05.15 |


